By Charlotte Lowrie
 With today’s digital SLR cameras, it is much easier for you to know if you have the best possible exposure while you are working in the field--at a time when you have an opportunity to reshoot if the initial exposure shows problems such as blown highlights or blocked shadows. Getting the best possible exposure is often as simple as quickly checking the image histogram, modifying the exposure settings, and then reshooting.
Before we go further, it’s important to point out that the goal is to get the best possible exposure in the camera instead of relying on RAW conversion and image-editing programs to “fix” an exposure after capture. I know from years of experience that there is a unique satisfaction in getting a great in-camera exposure. Additionally, getting excellent in-camera exposures means spending less timeat the computer trying to fix what could have been corrected during shooting. I don’t know about you, but I’d much rather spend my time making new images than sit at the computer trying to fix exposure problems.
If you’re new to reading histograms, this article will introduce you to the basics of interpreting a brightness histogram.
Before we look at histograms, it’s important to know what good exposure is. From an aesthetic point of view, a good exposure captures and expresses the scene as you saw and envisioned it. From a technical point of view, a good exposure:
- Maintains image detail through the highlights, or at least the most important highlights,
- Displays details in the shadows, something referred to as “open shadows,”
- Displays a full, rich range of tones with smooth transitions, and,
- Has pleasing contrast.
(In addition, the image should also have pleasing color that is true to the scene, and, of course, it should have sharp focus with the sharp focus set in the appropriate place in the scene or subject.)
These are the goals, but in everyday shooting, not every exposure will meet all the criteria of a good exposure. Sometimes, exposures are intentionally modified to meet the photographer’s creative vision or purpose for the image. A classic example of an intentionally imperfect exposure is when a photographer overexposes a portrait of a mature woman to minimize facial lines and wrinkles. Although the exposure is imperfect, it flatters the subject and creates a pleasing image.
Other times the exposure cannot meet the criteria due to the scene light. For example, in some scenes, the range from highlight to shadow in the scene (as measured in f-stops) is so wide that it’s beyond the capability of the image sensor to record all of the tones. This is referred to as a high-dynamic range (HDR) scene. If you’re shooting a single image, then the goal is to properly expose the subject and let the rest of the scene fall where it may. Alternately, the way to capture all the tones is by making a series of images that are bracketed by shutter speed. These images are then combined using a High-Dynamic Range (HDR) program such as Nik’s HDR EFex Pro that produces a single final image that uses the best from each of the bracketed images.
In short, there are times and scenes where a good exposure is modified for creative or practical effect, or is impossible due to the scene itself. But for most images, your goal is to get the best exposure you can in the camera. And to do that, all you need to do is to evaluate the histogram after you capture the image.
 A histogram is a bar graph that shows the distribution and number of pixels captured at each brightness level. Most cameras offer both a brightness and RGB histograms. For purposes of this article, we’ll talk about the brightness histogram that shows the exposure bias and the overall tonal distribution within the image. The horizontal axis shows the range of tonal brightness values, and the vertical axis displays the number of pixels at each location.
When you view the histogram on the camera’s LCD, the values range from black (level 0 on the left side of the histogram) to white (level 255 on the right side of the histogram). Note that even with cameras that capture 14-bit RAW images, the image preview and histogram are based on an 8-bit JPEG rendering of the RAW file. There are technical reasons why the camera doesn’t display a histogram of the RAW image, but for now, just know that if you’re shooting RAW images, the camera histogram will display a much less robust version of the image. But the histogram is still your best in-the-field tool for gauging exposure problems even with RAW capture.
You may not be reviewing your images on the camera with the histogram displayed because it makes the preview image almost to small to evaluate. But it’s very easy to move among different playback views. On many Canon cameras, just press the Info. button multiple times to switch among playback views. That makes it easy to see the brightness histogram, and then press the Info. button once or twice to move back to the single-image view.
Before we look at some histograms, it’s good to know that a histogram simply reflects the scene brightness and how the camera captured the brightness levels. Different scenes produce different histograms. A scene that has primarily light tones such as a tree against a field of snow will have the majority of pixels grouped to the right (highlight) side of the graph. A picture of a black train engine will have the majority of pixels grouped to the right half of the histogram. The proverbial “average” scene with a full range and distribution of tones will have pixels distributed across the graph. There is no right or wrong histogram. A histogram is simply a mirror reflection of the tones in the scene that you can use to avoid common exposure problems.
Exposure Goals for JPEG and RAW Capture
If you’ve read any of my books, then you know that there is a difference in exposure technique depending on whether you’re shooting JPEG images or capturing RAW images. If you’re shooting JEPG images, then the goal is to “expose for the highlights.” That means ensuring that the exposure retains image detail in all but specular highlights. (Specular highlights are those that are or reflect the light source. We expect that specular highlights will always be blown out.) With JPEG shooting, if you don’t capture the highlight detail (in other words, if they highlights blow out to pure white), then it can’t be added later. Blown highlights draw the viewer’s eye from the subject, and they are first place that the viewer’s eye tends to go to in the image.
If you’re capturing RAW images, then it’s good to bias the exposure to the right. This is commonly referred to as exposing to the right (ETTR). In RAW capture, half of all the image detail is contained in the first f-stop of brightness, so that if you underexpose the image one-half or a full f-stop, you have lost a significant amount of image data that can never be added back into the image. So the goal is to adjust the exposure so that the highlight pixels just touch the right side of the histogram. And if the exposure has blown highlights, you can often recover all or part of the highlight detail during RAW image conversion.
I shoot RAW exclusively. The histograms in this article are image histograms as seen in Adobe Camera Raw at the default settings.
Here is a basic guide to using the histogram to evaluate exposures as you’re shooting. Also, when I talk about “exposure,” it means the amount of light that reaches the image sensor. Thus to give an image more exposure means increasing the amount of light reaching the sensor by opening up the aperture (using a wider aperture such as f/5.6, f/4, or wider), or setting a longer shutter speed, or using a higher ISO setting such as 400, 600, and so on. Giving an image less exposure, means stopping down (using a narrower aperture such as f/8, f/11, f/16, or narrower), or setting a faster shutter speed, or using a lower ISO setting such as 100 or 200.
A Good Exposure
You may look at this histogram and wonder why it’s an “ideal” exposure when the line of pixels from the middle to the right side of the histogram is so thin (only one-pixel deep). That thin line of pixels represents image detail in the bright areas of the white boats and buildings. Without this one-pixel line, the highlights would be “blown out,” or solid white.
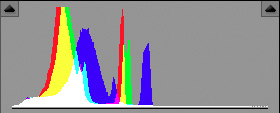
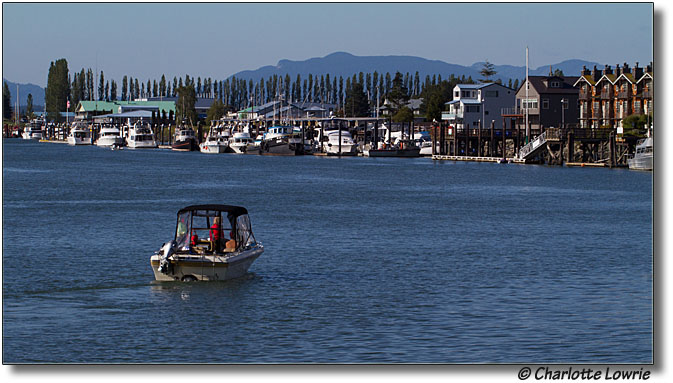
Exposure: ISO 200, f/14, 1/320 sec.
In other scenes, the highlights will have richer detail as in the following example.
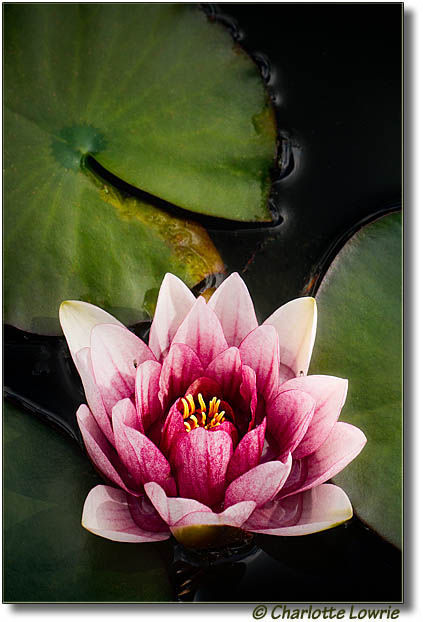
Exposure for the water lily image was ISO 200, f/8, 1/250 sec.
In both of these scenes, I was using Av shooting mode with Evaluative metering, and the camera’s ideal exposure was right on the money. Notice that in the water lily image, the shadows come very close to the left side of the histogram. But they do not crowd directly against the side of the graph, indicating that the shadows, though very deep, are not being discarded, or “clipped.” Any less exposure, and the shadows would have clipped.
An Overexposed Image
This is a typical HDR scene where the difference between the very bright sky and the shadowed foreground elements is beyond the capability of the image sensor to handle in a single image.
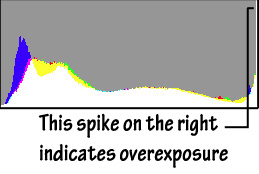
Exposure: ISO 100, f/8, 1/100 sec.
Given that I used Av shooting mode and Evaluative metering, to retain detail in the sky, I could:
- Set 1 to 2 stops of negative Exposure Compensation that would retain more detail in the sky, but it would also make the foreground elements very dark (blocking up shadow detail). I could then lighten the shadows during RAW conversion or in Photoshop, but lightening shadows will also reveal any digital noise hiding in those areas. If I were shooting in Manual mode, I would give less exposure by setting the aperture one or two stops narrower than the metered exposure (the camera’s metered exposure is indicated when the tick mark under the Exposure Level meter is at the center of the scale shown in the viewfinder. I could alternately change the shutter speed or the ISO to give less exposure.
- Use a Neutral Density (ND) filter on the lens. ND filters have a dark area that when placed to cover the sky area will hold back exposure from the area it covers. ND filters come in different densities usually measure as f-stops. A 1-stop ND filter holds back one f-stop of light from the exposure in the area it covers. Using an ND filter of the proper density is the most practical solution to getting a good a good single exposure of this scene.
- Shoot a series of images bracketed by shutter speed to expose for the shadows, the midtones, and for the sky, and the use an HDR program to combine the images into a single image that retains good detail throughout the scene.
Note: There is also the advanced metering approach of metering from a photographic gray card or from an area in the scene that has 18-percent reflectance. That approach is worthy of a separate article.
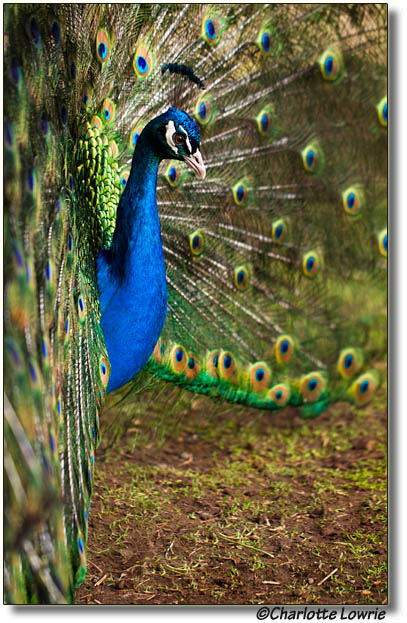
An Underexposed Image
This exposure shows me shooting at the worst for a RAW image. Here, I clearly underexposed this image by at least 1 f-stop. In RAW capture, it’s that first f-stop of image data that contains half of the total data in the image, so I lost half of what the EOS 7D has to offer. The excuse is that I was shooting quickly and was trying to avoid having the store manager run me out for shooting in the store. Of course, with RAW, I can get a fine image despite my blunder, but I’ll always know that I don’t have as rich a file as I otherwise would have had. Notice also that with the underexposure, the entire tonal range is pushed to the left of the graph causing clipping in the shadows.
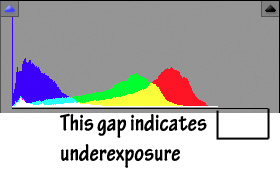
Exposure: ISO 100, f/2.8, 1/50 sec.
Again, I was shooting in Av mode using Evaluative metering with RAW capture. Now if I had been shooting JPEG capture, then this exposure would be very close to correct because the highlight on the rose petals were very bright before editing the image, and giving the image more exposure could push the highlights to blowing out. But speaking strictly from a RAW point of view, to get a good exposure, I would have:
- Set one stop (EV) of positive Exposure Compensation.
- I had been shooting in Manual shooting mode, I would set the exposure to one stop over the camera’s metered exposure by reducing the shutter speed to give the image more exposure. (Since my EF 24-70mm f/2.8L lens was at it’s maximum aperture of f/2.8, I didn’t have the option of opening up the lens.)
If you’ve read this far, I’ll conclude by saying that these examples represent only the tip of the exposure iceberg. Many other type of scenes and subjects create unique histograms. For example, some scenes or subjects have a much, much abbreviated tonal range, and my gallery of Visual Poetry images fall into that category. As time allows, I’ll do a follow-up article to show some non-standard examples.
Until then, I hope that you will use the histogram as you're shooting to get the best possible exposure in the camera.
Related articles:
Related online course:
